When you try to install Windows Vista, you may receive one of the following Stop error messages:
STOP 0x0000000A IRQL_NOT_LESS_OR_EQUAL
STOP 0x000000D1 DRIVER_IRQL_NOT_LESS_OR_EQUAL
Warning This workaround may make a computer or a network more vulnerable to attack by malicious users or by malicious software such as viruses. We do not recommend this workaround but are providing this information so that you can implement this workaround at your own discretion. Use this workaround at your own risk.
If you receive a "Stop: 0x0000000A" error message or a "Stop: 0x000000D1" error message when you try to upgrade to Windows Vista, follow these steps:
1. Restart the computer.
2. Roll back the installation to the previous operating system.
3. Use the Windows Vista Upgrade Advisor to check for known issues.
4. Disconnect any external hardware devices that are connected to the computer. Additionally, remove or disconnect any hardware that the computer manufacturer does not support. Also, remove any hardware that you recently installed.
5. If you receive either of these error messages during the first phase of the upgrade installation,
follow these additional steps:
a. In the previous operating system, update any installed antivirus and antispyware programs, and then scan the computer for problems.
Note If you find any problems, we recommend that you perform a clean installation of Windows Vista.
b. After you scan the computer for viruses and for spyware in the previous operating system, uninstall any antivirus and antispyware software.
c. Contact the computer manufacturer for information about any known Windows Vista compatibility issues and about how to obtain and to install a BIOS update.
6. Try to upgrade to Windows Vista again.
More Related Search
How to Troubleshoot Windows Vista Error 0x0000007B
Fix 0x000000A5 Error In Windows Vista
Windows Vista Support
Thursday, April 30, 2009
Monday, April 27, 2009
Fix when your bluetooth device not detected
What you can do when your device is not detected, This post provide technical support and step by step instruction to troubleshoot this issue.
Follow the instruction
1. In Device Manager, locate Bluetooth Radios, and then verify that the radio is listed. To do this, follow these steps:
1. Click Start, and then click Run.
2. Type devmgmt.msc, and then click OK.
3. Locate and then click the Bluetooth radio device.
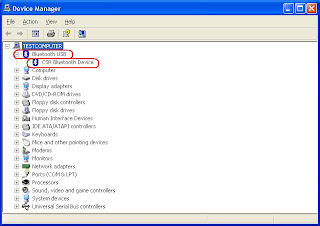
2. Determine what other USB devices are currently connected. The Bluetooth device may not have enough power.
If there are no entries in Device Manager or in Control Panel, the transceiver is not obtaining enough power for detection. Try unplugging other USB devices.
If Device Manager and Control Panel entries exist for a device, but the device is not detected or it is not connecting correctly, the device may not have been authenticated through the software.
Wednesday, April 22, 2009
Rasdiag.exe Support Tool in Windows XP
This post descrive how to use Rasdiag.exe Support Tool in Windows XP.The Remote Access Service Diagnostics Tool (Rasdiag.exe) collects diagnostic information about remote support services and places that information in a file. Administrators can use this tool to work with Microsoft Product Support Services to troubleshoot remote connection issues by taking a snapshot of the configuration data and capturing an attempted remote connection.
To start Rasdiag, click Start, click Run, type cmd, and then press ENTER. At the command prompt, type rasdiag.exe, and then press ENTER. Rasdiag.exe uses the following command-line switches.
Collapse this tableExpand this table
Parameter-------------------Description
-r (ipaddr)-------------------Enable remote sniff.
-t ---------------------------Enable remote routing table collection (requires -r).
(Filename.rdg)--------------Extract Rasdiag file (for example: rasdiag.exe sample.rdg).
/?---------------------------Display Help.
-?---------------------------Display Help.
When you run Rasdiag, you see the following information:
Preparing WindowsXP for RAS diagnostics.
--------------------------------------------------------------------------------
RASDIAG - RAS Diagnostic/Troubleshooting Tool
--------------------------------------------------------------------------------
INSTRUCTIONS
1) At this time, please reproduce the problem you are seeing.
2) Once the problem has been reproduced, please return to this console
and press the space bar.
3) Wait for diagnostics and data collection process to complete. This
process will be complete the RASDIAG folder has opened on your
desktop. In this folder, you will find an .RDG file.
4) Please provide this .RDG file to your support contact.
NOTE: The netmon driver is actively capturing on this machine's
WAN and LAN interfaces. If you are able to successfully make a
connection, and the problem you are seeing is related to network-layer
connectivity, please perform the data-related action at this time
--------------------------------------------------------------------------------
STATUS: Waiting for you to REPRO and press the space bar in this console
After this is displayed, reproduce the issue you want to capture information about (for example, start a dial-up connection and log on to a server). After the action is completed, make the command prompt window the active window and press SPACEBAR. Pressing SPACEBAR causes Rasdiag to stop capturing information and write it to a compressed file with a .rdg extension. The name of the file is the date and time it was created. You can then send this file to your support contact.
This file contains a Network Monitor capture (.cap) and Rasdiag.txt file. To extract the files, type rasdiag filename.rdg. The contents of the compressed file are extracted in the same folder.
Thursday, April 16, 2009
How to Reduce Boot Time for Windows
I know that Windows runs super slow in some people's machine. And try as hard as you can but you can seldom find a good reason for the slowing up or a remedy to it. So here is a surprising Technical support which can improve your Windows booting time. if you uninstall your unused fonts. Believe it or not it happens because it simply frees up a whole lot of memory of Windows when it boots.
Technical Trick
1. Simply go to Window’s Fonts Folder. Using CTRL key select all fonts that you never/rarely use and just press the DEL key.
Though I don't like the first method because it deletes all the fonts. Here is a very dumb but effective process to retain the fonts and still delete them from that folder.
2. Simply stop the loading up of unused fonts at system startup (instead of completely deleting them). For this, just COPY all unused fonts from the Window’s Fonts Folder and PASTE them at any other location on hard drive. Now DELETE all the unused Fonts (those you recently copied to another location) from the Window’s Fonts Folder.
The next time Windows Boots up, it will definitely be faster than previous boots.
Monday, April 13, 2009
Fix Access Denied Error In Vista
This post technical support for fix Access Denied error occur in Windows Vista. Access is denied while trying to access My Documents folder in Windows Vista
Cause: This behavior occurs because files in the My Documents, My Music, My Pictures, and My Videos folders in Windows XP are transferred to the following folders in Windows Vista:
? %systemdrive%\Users\user_name\Documents
? %systemdrive%\Users\user_name\Music
? %systemdrive%\Users\user_name\Pictures
? %systemdrive%\Users\user_name\Videos
The My Documents, My Music, My Pictures, and My Videos folders in Windows Vista are junction points. A junction point is a protected operating system folder that points to another folder. The junction point is an important part of application compatibility and does not contain any data or other files.
When you upgrade Windows XP to Windows Vista, Windows Vista sets the Read permissions of the My Documents, My Music, My Pictures, and My Videos folders to Deny. Therefore, you cannot access these junction points. However, if you try to access these junction points, you are redirected to the following folders:
?%systemdrive%\Users\user_name\Documents
?%systemdrive%\Users\user_name\Music
?%systemdrive%\Users\user_name\Pictures
?%systemdrive%\Users\user_name\Videos
By default, a junction point has the following settings after you upgrade Windows XP to Windows Vista:
?The attribute of a junction point is hidden.
?The Read permission of a junction point is Deny.
If you change these default settings, the system will become unstable.
Solution: If the My Documents, My Music, My Pictures, and My Videos links in the Start menu do not point to the Documents, Music, Pictures, and Videos folders, you must manually redirect these links to the correct folders. To redirect these links, follow these steps:
1.Click Start, right-click the link, and then click Properties.
2.On the Location tab, replace the wrong target location with the correct target location. For example, to redirect the My Music folder to the Music folder in Windows Vista, enter %systemdrive%\Users\user_name\Music.
3.Click Apply.
In some cases, when you upgrade Windows XP to Windows Vista, the upgrade does not correctly transfer files from the My Documents, My Music, My Pictures, and My Videos folders in Windows XP to the Documents, Music, Pictures, and Videos folders in Windows Vista. If you cannot find these files, search for them in the following hidden folders:
?%systemdrive%\$INPLACE.~TR\Machine \Data\Documents and Settings\user_name\My Documents
?%systemdrive%\$INPLACE.~TR\Machine\Data\Documents and Settings\user_name\My Documents\My Music
?%systemdrive%\$INPLACE.~TR\Machine\Data\Documents and Settings\user_name\My Documents\My Pictures
?%systemdrive%\$INPLACE.~TR\Machine\Data\Documents and Settings\user_name\My Documents\My Videos
To view files in the hidden folders, follow these steps:
1.Open Windows Explorer.
2.On the Tools menu, click Folder Options.
3.Click the View tab.
4.In the Advanced settings list, click Show hidden files and folders under Hidden files and folders, and then click OK.
Friday, April 3, 2009
How to restore the disabled startup programs
This post provide further information about How to restore the disabled startup programs after an upgrade from Windows 98 or Windows Millennium Edition to Windows XP. After you upgrade your computer from Microsoft Windows 98 or Microsoft Windows Millennium to Windows XP, the programs that previously loaded during the startup process may not be listed in the notification area (the system tray), and they no longer start automatically when you start your computer.
This behavior can occur if Windows XP removes all of the program files (all of the .lnk and .exe files) from the Startup menu and the Run key in the registry, except for the "known good programs," which are not removed. You can observe this behavior after Setup is complete and you have logged on to your computer for the first time. The files and values are moved to a hidden folder and registry key. Then, the Microsoft System Configuration Utility (Msconfig.exe) is populated with the Startup tab information.
To Fix windows Operating System issue, reinstall the values to the registry and the programs from the Startup folders:
1. Click Start, click Run, type msconfig, and then click OK.
2. Click the Startup tab.
3. Click the Restore Startup Programs option.
4. Select the programs that you want to restore, and then click OK.
5. Restart the computer.
NOTE: This option is not available if Windows XP Setup did not disable any programs from loading during the startup process.


