In this section I am going to discuss about How to Install Recovery Console. You can install the Recovery Console on your computer to make it accessible if you cannot restart Windows. You can then select the Recovery Console option from the list of available operating systems for the duration of startup. Install the Recovery Console on important servers and on the workstations of IT personnel. This addition describes how to install the Recovery Console to your Microsoft Windows XP-based computer. To install the Recovery Console, you have to be logged on as an administrator.
Although you can run the Recovery Console by starting directly from the Windows XP CD, it is generally more suitable to set it up as a startup option on your startup menu. To run the Recover Console directly from the CD, see the "How to use the Recovery Console" section.
Follow the steps given below:
1. Insert the Windows XP CD into the CD-ROM drive.
2. Click Start, and then click Run.
3. In the Open box, type d:\i386\winnt32.exe /cmdcons where d is the drive letter for the CD-ROM drive. In the case of 'Microsoft Windows XP Professional x64 Edition, type d:\amd64\winnt32.exe /cmdcons where d is the drive letter for the CD-ROM drive.
4. A Windows Setup Dialog Box appears. The Windows Setup Dialog Box describes the Recovery Console option. To confirm the installation, click Yes.
5. Restart the computer. The next time that you start your computer, "Microsoft Windows Recovery Console" appears on the startup menu.
Alternatively, you can use a Universal Naming Convention (UNC)-established connection to install the Recovery Console from a network share point.
Note You may receive an error message that is similar the following:
Setup cannot continue because the version of Windows on your computer is newer than the version on the CD.
Resolve this problems get use Microsoft Support article Recovery Console on a Microsoft Windows XP Service Pack 2-based computer
Monday, December 29, 2008
Tuesday, December 23, 2008
How Stop 0x9F Error On Windows Vista and Windows XP
I am staring my Computer Help Canada blog with new updates.In addition we discuss about 0x9F error in windows Vista and 0x9F error in Windows Operating System. This error occurs in windows vista when your computer wakes up from sleep mode and in windows XP it occurs when one or more driver install on your computer are unable to handle power state.
Stop 0x9F Error On Windows Vista
The following Stop 0x9F error message may be displayed on your Windows Vista computer when your system wakes up from sleep mode:
"STOP 0x0000009F (parameter1, parameter2, parameter3, parameter4) DRIVER_POWER_STATE_FAILURE"
Cause of the Error
This error message is usually displayed if a device using Institute of Electrical and Electronics Engineering (IEEE) 1394 connection is attached to your Windows Vista PC. Some of the examples of such devices are an Apple iPod and Maxtor One Touch II 300 GB model external hard disk.
Resolution Method
You can resolve this problem by installing the 929762 on your system. To download the update package for Windows Vista 64-bit computer, click here
You can also resolve the issue by downloading and installing the latest Windows Vista Service Pack on the PC. You can obtain information about the latest service pack from the Windows Update
Stop 0x9F Error On Windows XP
You may receive the following Stop 0x9F error message on your Windows XP computer:
"STOP 0x0000009F DRIVER_POWER_STATE_FAILURE"
Cause of the Error
The cause for this error when drivers are unable to handle power state transition requests when the system is:
• shutting down.
• going in to Standby mode or resuming from it.
• going in to Hibernate mode or resuming from it.
Steps for Resolution:
To resolve this issue, you need to find out the offending device or file system filter driver and repair or remove it from the system. You can do this by performing the following steps:
1. Check to make sure that your computer and all installed devices are on the Hardware Compatibility List (HCL). You can view the HCL at the following Microsoft Web site:
http://www.microsoft.com/whdc/hcl/default.mspx
2. Check for drivers that are not designed for use with Windows. You can use the Sigverif.exe tool to do this. For information about how to use the Sigverif tool, HOW TO: Verify Unsigned Device Drivers in Windows XP
3. Check for driver updates that may be available for your hardware.
4. Update any software that uses filter drivers (for example, antivirus, remote control, and backup software).
5. Remove any non-critical devices and software to help isolate the device or software that is causing the error.
6. Install Windows in a new folder. Add drivers one by one, and restart the computer after each addition, to try to locate the driver that is causing the error.
To prevent stop errors, such as the Stop 0x9F error, it is essential that you keep your computer and device drivers updated with the latest releases. You must also take care not to install incompatible software, hardware, and drivers on the system.
Friday, December 19, 2008
How to Back Up the System State on a Domain Controller
This addition gets information about How to take back up of system state on a domain controller. Here some steps given below these provide help for computer repair and create back up of system state.
These steps are following:
1. Click Start, point to Programs, point to Accessories, point to System Tools, and then click Backup.
2. Click the Backup tab.
3. Click to select the System State check box. (All of the components to be backed up are listed in the right pane. You cannot individually select each item.)
NOTE: During the system state backup, you must select to back up the Winnt\Sysvol folder. You must also select this option during the restore operation to have a working sysvol after the recovery.
The following information applies only to domain controllers. You can restore member servers the same way, but in normal mode.
If any of the following conditions are not met, the system state is not restored. Backup attempts to restore the system state, but does not succeed.
• The drive letter on which the %SystemRoot% folder is located must be the same as when it was backed up.
• The %SystemRoot% folder must be the same folder as when it was backed up.
• If sysvol or other Active Directory databases were located on another volume, they must exist and have the same drive letters also. The size of the volume does not matter.
Wednesday, December 17, 2008
How to STOP 0x0000000A" Error Message
Today learn about a new error solution and get best Computer Repair tips. In this section find out about 0x0000000A error massage. When you change between AC power and DC power on your laptop computer, you may receive a "STOP 0x0000000A" error message on a blue screen. This is more likely to occur when you unplug or replug the power supply into the computer while it is in Standby mode, and then resuming.
Resolution Steps:
To resolve these problems, you need to latest service pack for windows XP. How to obtain Windows XP service Pack.
Hotfix information
A supported hotfix is available from Microsoft. However, this hotfix is intended to correct only the problem that is described in this article. Apply this hotfix only to systems that are experiencing this specific problem. This hotfix might receive additional testing. Therefore, if you are not severely affected by this problem, we recommend that you wait for the next software update that contains this hotfix.
If the hotfix is available for download, there is a "Hotfix download available" section at the top of this Knowledge Base article. If this section does not appear, contact Microsoft Customer Service and Support to obtain the hotfix.
Note If additional issues occur or if any troubleshooting is required, you might have to create a separate service request. The usual support costs will apply to additional support questions and issues that do not qualify for this specific hotfix. For a complete list of Microsoft Customer Service and Support telephone numbers or to create a separate service request, visit the following Microsoft Web site:
http://support.microsoft.com/contactus/?ws=support
Note The "Hotfix download available" form displays the languages for which the hotfix is available. If you do not see your language, it is because a hotfix is not available for that language.
Monday, December 15, 2008
How to Debug "Stop 0xC2" or "Stop 0x000000C2" Error Messages
Hi, Today I am going to add a new tips in our computer help services which is help to fix the problem related to BAD_POOL_CALLER. In addition to BAD_POOL_CALLER_Stop 0xC2 error. This error when you try to print a document in windows 2000 or open a document in windows explorer. Windows 2000 contains many included features that enhance the pool allocation process. A number of new stop codes have been added that help you find drivers that do not function correctly. Because of these extra features, you may be able to find the root cause of the driver's malfunction by simple debugging.
The following procedure describes how to debug a OxC2 stop.
First, check the stop documentation. For example:
BAD_POOL_CALLER (0xC2)
The current thread is making a bad pool request. Typically this is at a bad IRQL level or double freeing the same allocation, etc.
1 - type of pool violation the caller is guilty of.
6 - the pool address being freed is already free.
7 - the pool address being freed is already free.
8 - parameter 2 is the IRQL allocating at, parameter 3 is the pool type
9 - parameter 2 is the IRQL freeing at, parameter 3 is the pool type
Parameter 1 = 0x1, 0x2, or 0x4 : Pool header has been corrupted
Parameter 2 = Pointer to pool header
Parameter 3 = First part of pool header contents
Parameter 4 = 0
Parameter 1 = 0x6 : Attempt to free pool which was already freed
Parameter 2 = Reserved (__LINE__)
Parameter 3 = Pointer to pool header
Parameter 4 = Pool header contents
Parameter 1 = 0x7 : Attempt to free pool which was already freed
Parameter 2 = Reserved (__LINE__)
Parameter 3 = Pointer to pool header
Parameter 4 = 0
Parameter 1 = 0x8 : Attempt to allocate pool at invalid IRQL
Parameter 2 = Current IRQL
Parameter 3 = Pool type
Parameter 4 = Size of allocation
Parameter 1 = 0x9 : Attempt to free pool at invalid IRQL
Parameter 2 = Current IRQL
Parameter 3 = Pool type
Parameter 4 = Address of pool
Parameter 1 = 0x40 : Attempt to free usermode address to kernel pool
Parameter 2 = Starting address
Parameter 3 = Start of system address space
Parameter 4 = 0
Parameter 1 = 0x41 : Attempt to free a non-allocated nonpaged pool
address
Parameter 2 = Starting address
Parameter 3 = physical page frame
Parameter 4 = highest physical page frame
Parameter 1 = 0x50 : Attempt to free a non-allocated paged pool address
Parameter 2 = Starting address
Parameter 3 = Start offset in pages from beginning of paged pool
Parameter 4 = Size in bytes of paged pool
Parameter 1 = 0x99 : Attempt to free pool with invalid address (or
corruption in pool header)
Parameter 2 = Address being freed
Parameter 3 = 0
Parameter 4 = 0
After you have collected detailed information about the 0xC2 stop, use the debugger:
E:\bin>i386kd -z K:\DOWNLOAD\memory.dmp
Loading Dump File [K:\DOWNLOAD\memory.dmp]
Full Kernel Dump File
...
0: kd> !reload GOOD HOUSEKEEPING DONE HERE
0: kd> dd kibugcheckdata l8 DUMPING THE ERROR
8047fba0 000000c2 00000007 00000b68 815bade0
8047fbb0 815bade8 e1007000 00000000 818988c0
0: kd> kv DUMPING STACK
ChildEBP RetAddr Args to Child
bdce0348 be11dc84 e1fff000 a08d0008 000007f8 banshee!vH3ImageTransferMm32
bdce037c be116f18 be85fd78 00000001 bdce03dc banshee!vMmXferNative
bdce03ac be113eec e1fff000 e25e2a38 bdce03dc banshee!vPutBits
bdce03e8 a008e47f e1ff86f8 e25e2a38 e1fef908 banshee!DrvCopyBits
bdce0430 a008e899 be113d40 bdce04d8 e1ff86f8 win32k!OffCopyBits
bdce04e4 a008e4d1 e1ff86f8 e25e2a38 00000000 win32k!SpBitBlt
The stop documentation indicates that memory is being freed. This information is indicated by the following line:
Parameter 1 = 0x7: Attempt to free pool which was already freed.
But the stack shows that the video card is in the process of a write, so you must continue to investigate. First, you must determine if this computer is a multiprocessor.
0: kd> ~1 SWITCH PROC
1: kd> kv DUMPING STACK
ChildEBP RetAddr Args to Child
bde81b7c 8046894d 815bade8 00000000 be03bb2b ntkrnlmp!ExFreePoolWithTag
bde81b88 be03bb2b 815bade8 be03ca94 815bade8 ntkrnlmp!ExFreePool
00000128 00000000 00000000 00000000 00000000 BADDRIVER
The preceding text indicates that memory is freed through the driver drivername. This could be the possible root cause.
Next, define the driver:
1: kd> !drivers
Loaded System Driver Summary
Base Code Size Data Size Driver Name Creation Time
80400000 139f40 (1255 kb) 4f3c0 (316 kb) ntoskrnl.exe Tue Dec 07 14:05:26 1999
80062000 ffe0 ( 63 kb) 3d60 ( 15 kb) hal.dll Tue Nov 02 20:14:22 1999
ed410000 1760 ( 5 kb) 1000 ( 4 kb) BOOTVID.dll Wed Nov 03 20:24:33 1999
ed49c000 1b00 ( 6 kb) 680 ( 1 kb) gameenum.sys Sat Sep 25 14:35:57 1999
ed080000 a000 ( 40 kb) 20c0 ( 8 kb) VIDEOPRT.SYS Sat Nov 06 16:55:20 1999
bfdcf000 1d480 ( 117 kb) 7520 ( 29 kb) mga64m.sys Mon Nov 29 20:47:46 1999
bfdbc000 11600 ( 69 kb) 1600 ( 5 kb) el90xnd5.sys Fri Oct 29 17:54:34 1999
ed090000 3a60 ( 14 kb) 5980 ( 22 kb) banshee.sys Fri Oct 29 19:00:56 1999
ed5df000 2e0 ( 0 kb) 4a0 ( 1 kb) audstub.sys Sat Sep 25 14:35:33 1999
ed370000 33e0 ( 12 kb) a40 ( 2 kb) raspti.sys Fri Oct 08 16:45:10 1999
ed0c0000 c5e0 ( 49 kb) 20e0 ( 8 kb) parallel.sys Fri Oct 22 18:00:54 1999
ed5e0000 580 ( 1 kb) 540 ( 1 kb) swenum.sys Sat Sep 25 14:36:31 1999
be552000 72a60 ( 458 kb) 13c40 ( 79 kb) mga64d.dll Tue Nov 30 04:33:19 1999
be113000 36f00 ( 219 kb) 7a20 ( 30 kb) banshee.dll Tue Nov 30 04:31:18 1999
be031000 FFFF ( FF kb) FFFF ( F kb) BADDRIVER.sys Mon Feb 30 23:22:43 2000
TOTAL: 7f8dc0 (8163 kb) 172140 (1480 kb) ( 0 kb 0 kb)
The preceding text indicates that the driver is used by a third-party software package. This driver is most likely the cause of the error. To further investigate this issue, search the Microsoft Knowledge Base for more information. Also, check the file properties with Windows Explorer or by using a Hex editor on the file itself. You can also check the vendor's Web site for any updates or known issues.
Note: If you have any problem relates to Printer you can follow my another blog Computer Printer Repair.
Tuesday, December 9, 2008
How to Troubleshoot a Stop 0xC0000218 Error Message
In this addition learn about how to troubleshoot (Registry File Failure) error. Windows Based Computer System some time given an error Stop 0xc0000218 (0xe11a30e8, 0x00000000, 0x000000000, 0x00000000) UNKNOWN_HARD_ERROR. In addition discussed about computer support to fix registry file failure. A Stop 0xc0000218 error message means that a necessary registry hive file could not be loaded. This error message can happen if the file is corrupt or missing. To resolve this problem, you can reinstall the operating system and restore the registry files from a backup. The registry files may have been corrupted because of hard disk corruption or some other hardware problem. To resolve this issue follows the steps given below:
1. Start your computer by running the Recovery Console, run the chkdsk /p command on the drive, and then restart your computer. Test to determine whether the issue is resolved. If the issue is resolved, do not complete the remaining steps. If the issue is not resolved, go to step 2.
2. When Windows loads, press SPACE BAR when the "Load Last Known Good" message appears.
3. Complete a parallel installation, and restore the registry files from a tape backup. To do so:
o Reinstall Windows in a separate folder.
o Restore the damaged registry hive from backup. This procedure is specific to the backup application that you used to make a backup. Consult the documentation of your backup application or consult the vendor if you need assistance. Typically, this procedure requires you to restore a system state backup to an alternate location, and then copy the appropriate registry files to the %SYSTEMROOT%\System32\config folder of the damaged operating system.
o If you do not have a tape backup, include the backup of network servers and production workstations.
NOTE: If Windows is stored on a FAT partition, you can restore the files by using another computer and by copying the registry hive files to the %SYSTEMROOT%\System32\Config subfolder.
If computer facing registry error and you facing too much problems you can take help from Microsoft Support Center Articles
Thursday, December 4, 2008
Installation Process Of Windows XP
Windows XP operating system is very user friendly for use with computer system. If youi want r to Install Windows 98, Windows ME, Windows NT and later version of XP you can. But mostly people do not know installation process for the windows XP. Mostly computers come new PC already installed Windows XP. But If due to any reason your OS is corrupted and you want to reinstall fresh Windows XP on your computer you can follow the steps of Installation Process of XP.
Installation Process
Installing Windows XP can take up to two hours. To make the process more manageable, it has been broken up into several sections. When you are ready, install Windows XP:
Section 1: Begin the Installation
1. Insert the Windows XP CD into your computer and restart your computer.
2. If prompted to start from the CD, press SPACEBAR. If you miss the prompt (it only appears for a few seconds), restart your computer to try again.
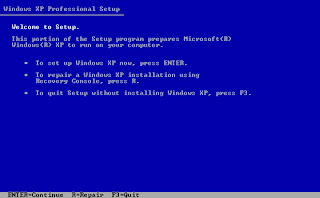
 3. Windows XP Setup begins. During this portion of setup, your mouse will not work, so you must use the keyboard. On the Welcome to Setup page, press ENTER.
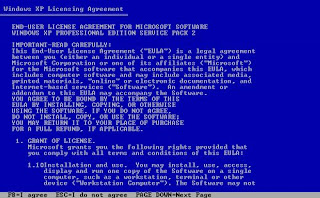
4. On the Windows XP Licensing Agreement page, read the licensing agreement. Press the PAGE DOWN key to scroll to the bottom of the agreement. Then press F8.
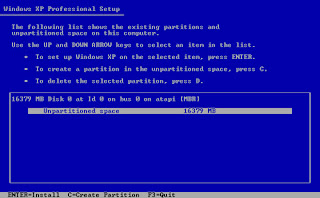
 5. This page enables you to select the hard disk drive on which Windows XP will be installed. Once you complete this step, all data on your hard disk drive will be removed and cannot be recovered. It is extremely important that you have a recent backup copy of your files before continuing. When you have a backup copy, press D, and then press L when prompted. This deletes your existing data.
6. Press ENTER to select Unpartitioned space, which appears by default.
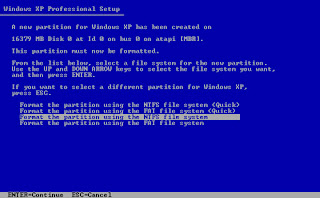
 7. Press ENTER again to select Format the partition using the NTFS file system, which appears by default.
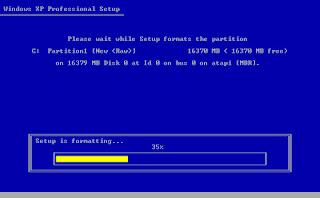
 8. Windows XP erases your hard disk drive using a process called formatting and then copies the setup files. You can leave your computer and return in 20 to 30 minutes.
Section 2: Continue the installation
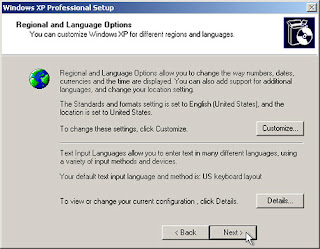
9. Windows XP restarts and then continues with the installation process. From this point forward, you can use your mouse. Eventually, the Regional and Language Options page appears. Click Next to accept the default settings. If you are multilingual or prefer a language other than English, you can change language settings after setup is complete.
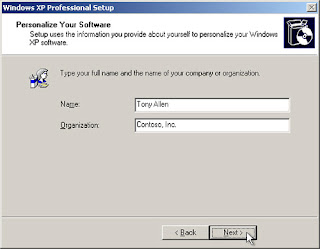
 10. On the Personalize Your Software page, type your name and your organization name. Some programs use this information to automatically fill in your name when required. Then, click Next.
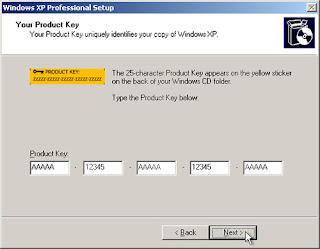
 11. On the Your Product Key page, type your product key as it appears on your Windows XP CD case. The product key is unique for every Windows XP installation. Then, click Next.
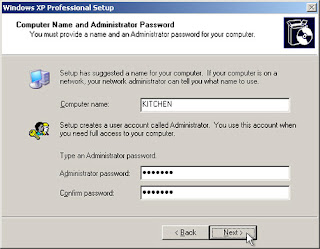
 12. On the Computer Name and Administrator Password page, in the Computer name box, type a name that uniquely identifies your computer in your house, such as FAMILYROOM or TOMS. You cannot use spaces or punctuation. If you connect your computer to a network, you will use this computer name to find shared files and printers. Type a strong password that you can remember in the Administrator password box, and then retype it in the Confirm password box. Write the password down and store it in a secure place. Click Next.
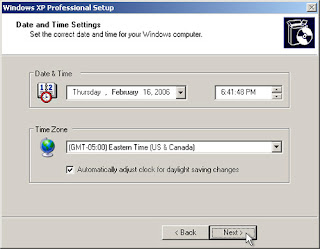
 13. On the Date and Time Settings page, set your computer’s clock. Then, click the Time Zone down arrow, and select your time zone. Click Next.
 14. Windows XP will spend about a minute configuring your computer. On the Networking Settings page, click Next.
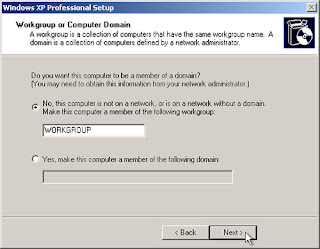
 15. On the Workgroup or Computer Domain page, click Next.
 Section 3: Complete the installation
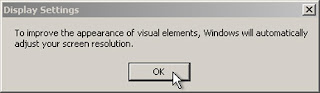
16. Windows XP will spend 20 or 30 minutes configuring your computer and will automatically restart when finished. When the Display Settings dialog appears, click OK.
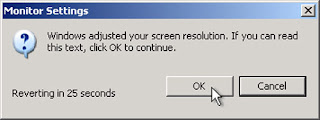
 17. When the Monitor Settings dialog box appears, click OK.
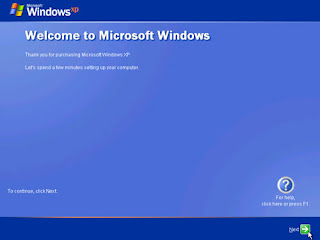
 18. The final stage of setup begins. On the Welcome to Microsoft Windows page, click Next.
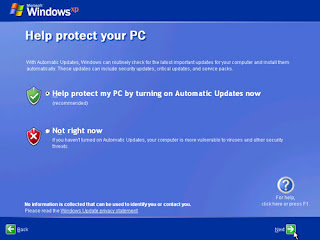
 19. On the Help protect your PC page, click Help protect my PC by turning on Automatic Updates now. Then, click Next.
 20. Windows XP will then check if you are connected to the Internet:
•If you are connected to the Internet, select the choice that describes your network connection on the Will this computer connect to the Internet directly, or through a network? page. If you’re not sure, accept the default selection, and click Next.
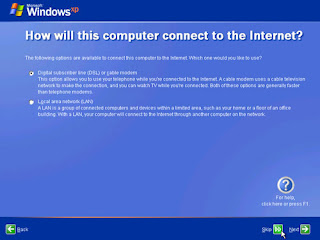
 •If you use dial-up Internet access, or if Windows XP cannot connect to the Internet, you can connect to the Internet after setup is complete. On the How will this computer connect to the Internet? page, click Skip.
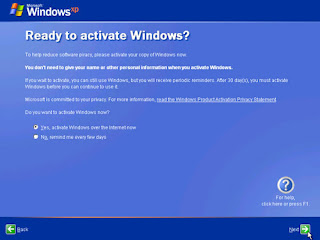
 21. Windows XP Setup displays the Ready to activate Windows? page. If you are connected to the Internet, click Yes, and then click Next. If you are not yet connected to the Internet, click No, click Next, and then skip to step 24. After setup is complete, Windows XP will automatically remind you to activate and register your copy of Windows XP.
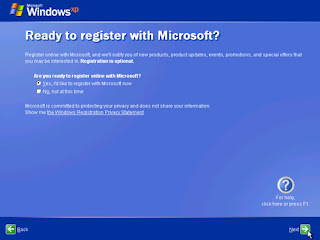
 22. On the Ready to register with Microsoft? page, click Yes, and then click Next.
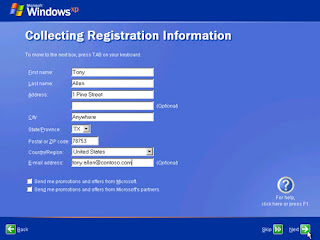
 23. On the Collecting Registration Information page, complete the form. Then, click Next.
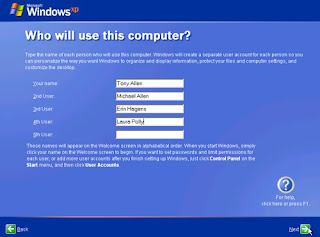
 24. On the Who will use this computer? page, type the name of each person who will use the computer. You can use first names only, nicknames, or full names. Then click Next. To add users after setup is complete or to specify a password to keep your account private, read Create and customize user accounts.
 25. On the Thank you! page, click Finish.
 Congratulations! Windows XP setup is complete. You can log on by clicking your name on the logon screen. If you’ve installed Windows XP on a new computer or new hard disk drive, you can now use the File and Settings Transfer Wizard to copy your important data to your computer or hard disk drive.
After logon, take a few minutes to validate your copy of Windows. Validation gives you access to hundreds of free downloads from the Microsoft Download Center. To learn about the new features Windows XP provides, click the Start button, click All Programs, click Accessories, and then click Tour Windows XP. I hope that it is useful for XP users who want to install Windows XP.
Installation Process
Installing Windows XP can take up to two hours. To make the process more manageable, it has been broken up into several sections. When you are ready, install Windows XP:
Section 1: Begin the Installation
1. Insert the Windows XP CD into your computer and restart your computer.
2. If prompted to start from the CD, press SPACEBAR. If you miss the prompt (it only appears for a few seconds), restart your computer to try again.
 3. Windows XP Setup begins. During this portion of setup, your mouse will not work, so you must use the keyboard. On the Welcome to Setup page, press ENTER.
4. On the Windows XP Licensing Agreement page, read the licensing agreement. Press the PAGE DOWN key to scroll to the bottom of the agreement. Then press F8.
 5. This page enables you to select the hard disk drive on which Windows XP will be installed. Once you complete this step, all data on your hard disk drive will be removed and cannot be recovered. It is extremely important that you have a recent backup copy of your files before continuing. When you have a backup copy, press D, and then press L when prompted. This deletes your existing data.
6. Press ENTER to select Unpartitioned space, which appears by default.
 7. Press ENTER again to select Format the partition using the NTFS file system, which appears by default.
 8. Windows XP erases your hard disk drive using a process called formatting and then copies the setup files. You can leave your computer and return in 20 to 30 minutes.
Section 2: Continue the installation
9. Windows XP restarts and then continues with the installation process. From this point forward, you can use your mouse. Eventually, the Regional and Language Options page appears. Click Next to accept the default settings. If you are multilingual or prefer a language other than English, you can change language settings after setup is complete.
 10. On the Personalize Your Software page, type your name and your organization name. Some programs use this information to automatically fill in your name when required. Then, click Next.
 11. On the Your Product Key page, type your product key as it appears on your Windows XP CD case. The product key is unique for every Windows XP installation. Then, click Next.
 12. On the Computer Name and Administrator Password page, in the Computer name box, type a name that uniquely identifies your computer in your house, such as FAMILYROOM or TOMS. You cannot use spaces or punctuation. If you connect your computer to a network, you will use this computer name to find shared files and printers. Type a strong password that you can remember in the Administrator password box, and then retype it in the Confirm password box. Write the password down and store it in a secure place. Click Next.
 13. On the Date and Time Settings page, set your computer’s clock. Then, click the Time Zone down arrow, and select your time zone. Click Next.
 14. Windows XP will spend about a minute configuring your computer. On the Networking Settings page, click Next.
 15. On the Workgroup or Computer Domain page, click Next.
 Section 3: Complete the installation
16. Windows XP will spend 20 or 30 minutes configuring your computer and will automatically restart when finished. When the Display Settings dialog appears, click OK.
 17. When the Monitor Settings dialog box appears, click OK.
 18. The final stage of setup begins. On the Welcome to Microsoft Windows page, click Next.
 19. On the Help protect your PC page, click Help protect my PC by turning on Automatic Updates now. Then, click Next.
 20. Windows XP will then check if you are connected to the Internet:
•If you are connected to the Internet, select the choice that describes your network connection on the Will this computer connect to the Internet directly, or through a network? page. If you’re not sure, accept the default selection, and click Next.
 •If you use dial-up Internet access, or if Windows XP cannot connect to the Internet, you can connect to the Internet after setup is complete. On the How will this computer connect to the Internet? page, click Skip.
 21. Windows XP Setup displays the Ready to activate Windows? page. If you are connected to the Internet, click Yes, and then click Next. If you are not yet connected to the Internet, click No, click Next, and then skip to step 24. After setup is complete, Windows XP will automatically remind you to activate and register your copy of Windows XP.
 22. On the Ready to register with Microsoft? page, click Yes, and then click Next.
 23. On the Collecting Registration Information page, complete the form. Then, click Next.
 24. On the Who will use this computer? page, type the name of each person who will use the computer. You can use first names only, nicknames, or full names. Then click Next. To add users after setup is complete or to specify a password to keep your account private, read Create and customize user accounts.
 25. On the Thank you! page, click Finish.
 Congratulations! Windows XP setup is complete. You can log on by clicking your name on the logon screen. If you’ve installed Windows XP on a new computer or new hard disk drive, you can now use the File and Settings Transfer Wizard to copy your important data to your computer or hard disk drive.
After logon, take a few minutes to validate your copy of Windows. Validation gives you access to hundreds of free downloads from the Microsoft Download Center. To learn about the new features Windows XP provides, click the Start button, click All Programs, click Accessories, and then click Tour Windows XP. I hope that it is useful for XP users who want to install Windows XP.
Monday, December 1, 2008
Hard disk space required for installing Windows XP SP3 on more than one computer
If you want to install Windows XP SP3 on more than one computer over a local network, you can use the Universal Naming Convention (UNC) mode of installation. Windows XP Installation Process is more typical so it need careful instruction.
To install Windows XP SP3 by using the UNC mode of installation, follow these steps:
1. Copy the contents of the Windows XP SP3 CD to a shared folder on the network.
2. Click Start, click Run.
3. Type cmd, and then press ENTER.
4. At the command prompt, type the following command, and then press ENTER:
windowsxp-kb936929-sp3-x86-enu.exe /x:shared folder name
Note In this command, shared folder name is a placeholder for the folder on the network to which you want to extract Windows XP SP3.
5. Under the shared folder on the network, locate and then double-click the Update folder.
Note The Update folder is located under the i386 folder.
6. Double-click the Update.exe file to install Windows XP SP3.


